
These are the instructions for constructing Aimee's Quilt - posted here as an aide memoir for me and free for you to use as well!
Fabric Requirements:
Fabric A - The Star PointsFabric B - The Star Centres- 32 x 2 1/2" squares (centres for the solid stars)
- 14 x 2 7/8" squares (centres for the mixed stars)
Fabric B - The Stripes & Centres- 56 x 2 1/2" squares (posts for the borders/diagonals)
- 14 x 2 7/8" squares (centre diamonds for the mixed stars)
Fabric C - The background- 32 x 2 1/2" squares (the corners of the solid stars)
- 60 x 2 7/8" squares (the infil for the star points)
- 44 x 8 1/2" x 2 1/2" strips (the short borders)
- 16 x 12 1/2" x 2 1/2" strips (the long borders)
If you're taking this from one piece of fabric allow 1.5m of 44" wide fabric
Fabric D - The inner border (1" finished)- A strip 1 1/2 " by 200" long
Fabric E - The outer border (3" finished)- A strip 3 1/2" wide by 230" long
Plus backing and borders.
Note: all measurements are a little vague at the moment as I haven't actually made the thing - to be confirmed once the top's completed!
Instructions:
Piecing The StarsFirst cut out all the star pieces as per the list above.
The next step is to make the half-square triangle units - There are two set of these to make - the star points and the mixed star centres. For the star points match 2 7/8" squares of A and C and for the mixed centres match 2 7/8" squares of B and C. With each pair of squares mark a line across the diagonal of the lighter block with a fabric marker, pencil or hera marker - this is your guide line. Now sew two line 1/4" on either side of the guideline (If you do not have a 1/4" foot on your machine mark these first as accuracy is important here). Finally cut along your guide line with a rotary cutter to seperate the square and press each unit flat (seams towards darker fabric) to produce two 2 1/2" squares.
As there are a lot of these to produce it's quickest to mark them all up first then sew all the left hand seams and then go back along the chain and sew the right hand seams rather than completing each unit before going onto the next.


Now that the triangle units are assembled you have a collection of 2 1/2" squares. The easiest way to assemble the stars is to prepare them in an assembly line fashion so start by taking all the star points (A/C triangles). Match these up in pairs with right sides together and make sure that they are exactly mirroring each other - A on top of A, C on top of C. Stitch along one of the edges where C & C meet (doesn't matter which) to produce a flying goose unit. Repeat with all the pairs until you have 60 flying geese and press these.

Next we assemble the centres of the stars. Take the stack of 2 1/2" B squares and sew them into pairs then press the seams. Take two pairs and sew them into a four patch - to make sure the middle points match perfectly make sure that the centre seams run in opposite directions and push them against each other until they 'lock'. Press each four patch.


Do the same with the A/B triangles - sew them into pairs and then into a four patch. When doing this be careful to make sure that you are always sewing the seams on the B fabric side so that you get a diamond in the middle. Press these too.
You now have all the building blocks of the star complete. Sew a flying goose onto the top and bottom of each four patch to make a centre unit. Press all seams towards the centre of the blocks.

Now prepare the side units. Take 14 flying geese and sew a 2 1/2" B square onto each side of the goose to make the sides of the mixed stars. Sew a 2 1/2" C square onto each side of the remaining 16 geese. Press all seams towards the corner blocks.

Finally match a goose strip to each side of the centre strips making sure 'lock' the outside seams together (the ones by the corner blocks) to ensure that the star points match up and attach them to the centre piece. Press all seams towards the centre of the block.


Completing the BlocksNow that the stars are finished it's time to add the borders to them to get the overall layout for the quilt. Start by adding an 8 1/2" strip to each side of the block - if your seams weren't precisely 1/4" every time these won't fit perfectly but don't try to force them to - just let them overlap a bit at one end and trim it off later; if you try to force them the quilt top will never lay flat which is a much bigger problem than slightly small blocks!

The final borders are different for each type of star. For the solid stars add a 12 1/2" border along the top and bottom of the block. For the mixed stars take the remaining 8 1/2" strips and add a B square to each end of them. Press the seams towards the corner squares.

Now sew one strip to the top and bottom of each mixed star block. Press all seams towards the centre of the block.

Assembling the Quilt TopOnce all the squares are made it's time to assemble them into the pieced quilt top. Because of the way the blocks the order you assemble the quilt in will depend on the way you want the solid star borders to run. I wanted the longer strips to run vertically so I assembled my blocks into vertical columns first - if you want the long strips to run horizontally assemble the rows first.
To assemble the quilt the first thing I did was match 6 sets of mixed & solid stars together into pairs and join them along one side. You want to be joining a 'short' border side of the solid star to any side of a mixed star - make sure that the seams are going in opposite directions however so that they lock together at the corners.
Once I had pairs I added the remaining 3 blocks onto 3 of the pairs so I had three 3-block strips and 3 2-block strips. These were then attached together to make 3 runners. Make sure that the 'long' borders on the solid stars are always running in the same direction (i.e. up/down the line of blocks). Once the 3 runners are complete press all the seams in the same direction.
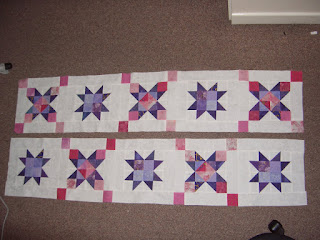
Finally to assemble the quilt pair up two of the runners, lock the seams (flip one runner around if they're running the wrong way) and pin these so they don't slip then join the strips together. Add the final runner in the same way and you're done. Iron all the seams and press the top flat.
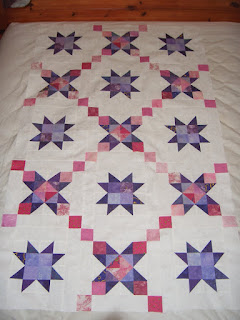 Borders
Adding the borders is incredibly easy to do. Firstly, don't even consider trying to make them the 'right' size! The odds that every seam you sewed is precisely 1/4" are so tiny as to be inconceivable, the easiest way to add the borders it to forget about the length and add them as you go.
The first step is thus to make a strip of border fabric long enough to go around the whole quilt plus a bit extra just in case, our 200" x 1 1/2" strip should do the job nicely. You can add the strip log-cabin style (sewing it along one edge of the quilt, cutting off the excess, working along the next edge etc) or along opposite edges and then along the remaining two (this gives a more symetrical finish). I went with the more symetrical option and sewed the border along the top and bottom first and then along the two sides.
The second, larger, border is added in exactly the same way using the 230" x 3 1/2" strip.
And that's it, the quilt it ready to go.

Backing, Wadding & Basting
The backing is easy to cut for this quilt because (in a very cunning move) the quilt should be just under 44" wide (standard width for fabric on a bolt) . Provided that we're a little bit careful how we put the quilt together we can thus simply cut a piece of fabric slightly longer than the length of the quilt and forget all about the pesky joining-the-backing-together stage. In this case the quilt is about 68" long so that's approx 170cm - get 2m to be safe or 2 1/2m if you want the binding to match the backing.
The wadding I chose for this quilt is 100% cotton (because it was going cheap and seemed better for a baby). If you don't have such concerns then 80/20 is easier to work with so I'd recommend going with that. You need a piece at least as large as the backing, preferably slightly larger - I took mine from a queen sized pack (far too big but will do for several quilts); a single bed sized roll should do fine.
Once the wadding is cut to approximately the right size (bigger is better) lay it down on a smooth, prefereably carpeted, floor and smooth it out flat. Next, lay the backing face up on top of it. Open the doors & windows and get out the 505 spray. Fold back half of the backing and spray the wadding it was laying on, smooth the fabric back over the wadding making sure there are no creases. If it doesn't lay quite right you will be able to lift it up and try again as the spray is fairly forgiving for the first half hour or so. Repeat with the other half of the backing.

Turn the whole assembly over and repeat the procedure with the top. Once finished you should have a quilt sandwich with the top face-up, the wadding and then the backing face-down, basically how you want the quilt to look when it's finished.
Instead of spray basting you could of course use the more traditional tacking or pinning methods. I loathe basting with a vengence and appreciate the speed at which I can spray the quilt together. Also, for machine quilting it's much easier not to have to worry about catching the tacking threads or removing the safety pins.
Quilting
I went with machine quilting for this quilt firstly because I didn't have a year to hand quilt it (my average time for completion!) and secondly because I'd been wanting to try out my new sewing machine for ages and this seemed like the perfect opportunity.
I chose Gutterman Sulky (4103 - Pansies) variegated thread to add some colour to the white background and echo the pinks & purples of the stars and quilted a simple meander across the whole of the pieced top (excluding the borders). I left the inner border plain (it's only 1" wide) and then qulited a stars and loops pattern in the outer border being careful to leave a 1/4" along the outer edge for the binding.

Detail of Quilting
Finishing Up
All that remains to do is bind and label the quilt. I went with a 'straight' binding rather than a bias binding (easier to make) but my binding technique needs a little work so I won't be giving step-by-step instructions here! I made a lable for the back of the quilt from some scraps of fabric and a little hand embroidery - alternative methods would be to embroider the quilt directly or use fabric markers or pre-printed labels (you can even buy some you can print from your computer)


