Monday 21 December 2009

Secret Santa Solved

Sometimes I love being able to sew! I was supposed to get getting wrapping for my gift for the office secret santa today but the snow caused some problems on the motorway and getting to Tesco (yes I was getting desperate) was going to take about an hour-and-a-half.. sooo not happening.

Which took me back to the original plan of making a pretty little gift bag for the bath stuff I bought from Lush to make it look all nice and appealing and I must say I'm really rather pleased with the results.


It's properly lined so all the seams are hidden but there isn't a fixed fastening - it just has a tie made of thin strips of the two fabrics bonded together.

The fabric was bought at a quilt fair when I made a policy of spending <£5/m and I used about 1/3 of a fat quarter of each which makes it 83p by my reckoning - added to the £4.60ish I spent on the actual gift I think that's pretty close to the £5 target when you consider that people don't normally account for the cost of gift wrap!

Thursday 17 December 2009

Sunday 6 December 2009

Black Cats Redux


I have finally finished the blocks for my Black Cats quilt; well, admitedly I have cheated and rather lowered the bar but I think it still counts as a victory! It was originally going to be a 420 block double bed sized monstrosity but it turns out that whilst making ickle blocks is fun for a while the novelty wears off fairly fast... it's now a 144 block wall hanging but I still rather like it, and it will actually stand a chance of being seen now. It will clock in at just under 34" square (maybe with a border added) with a total of 1872 pieces.

All that remains is to actually sew the blocks together, quilt it and hang it - but I'm a lot closer to finishing it than I was this morning :D

Monday 14 September 2009

Distractions

I think I may be having another little break from creative pursuits... I recently adopted three delightful little degus and they seem to be taking up all of my spare time - I never realised how long you could spend watching critters run around their cage/our spare room!

Meet Tyr, Ares and Set - our little gods of destruction

Wednesday 9 September 2009

Oops I did it again...

So, what have I been up to lately? I've make some progress on my wallhanging, it's not going quite as well as I hoped but I think it will still be presentable when its finished; the legs on the bird got a touch on the fat side but hopefully once the whole things quilted it will look less odd!


Unfortunately I also appear to be well on my way to a teensy bear addiction! I recently found out that one of my friends is unwell and as I was writing a card to her I decided that what she needed was a small bear to cheer her up! So I made her one.


The only problem is that the more I think about it the more trouble I have finding anyone who wouldn't like a small bear in their life.....

Wednesday 2 September 2009

Ain't he cute?

Due to a near total lack of sleep last night I decided it was best to avoid damaging my lovely new wallhanging so I went for something even lighter and fluffier this evening - making a little fabric bear!

Tanya showed some pictures of little tiny bears she had made with her english students and I rather feel in love with them so when she also posted instructions on how to make them I immediately filed them in my must-have folder.

And here is is - Batique the Bear (inspired naming ftw!)

Monday 31 August 2009

A new project for a new house

I think we're finally settled into the new place and I'm starting to feel like I have the energy left for something more than day-to-day life so I'm looking forward to getting back into my quilting again.

I'm supposed to be finishing off my Fire & Ice quilt so I started putting the blocks together into the quilt top recently - the only place big enough to lay it out was the decking in the back garden but I valiantly battled the breezes to find a composition that worked so now all I need to do is trim all the blocks to size and get the whole thing assembled; it's going to look completely different to how I originally invisioned it but I think it will work out well.

In the meantime I decided I needed something a bit lighter to work on and recently came across a new blog which caught my eye and fell in love with the owners delightful quilts. I am sorely tempted to pick up a few of her patterns but in the meantime I have set to work following her free tutorial to make a Flower Garden Pillow. She uses an kind of machine applique which I haven't come across before and which I think might be just the thing to hold my flying geese quilt together so I thought I'd try it out on a little wall hanging to brighten up my new room. I shall post pictures of my work in progress later but for now here is the inspiration:


The Original from this tutorial

Wednesday 22 July 2009

Long Time No See

I hadn't realised how long it had been since I updated this; the house-moving and holiday-going took more preparation than I expected so there's been absolutely nothing happening on the crafty-goodness front for far too long.

But, that's all about to change for the better! I still have no internet connection at home so no piccys but I have finally got my study/studio squared away and now have an entirely awesome room just for making things in. Also, I did get some more routine sewing done recently in the form of lining the bedroom curtains so the light doesn't wake us up at 5am.

We got a lovely new sofa for the lounge too so the room is now black & pine and just crying out for a nice black&white quilt for snuggling on the sofa (maybe even two so Rob can have one for the armchair!) I bought some snazzy b&w bedlinen from Ikea for the backing and the pillowcases are just the right size for my cushions so I have 'made' the worlds quickest cushion covers to brighten things up until the quilt is ready.

Now all I have to do is decide which project I want to work on first and get to work finishing some of the things I've already got started.

Tuesday 26 May 2009

Flying Free

I've been knocking around some ideas for my first ever Art Quilt for a while now and, since the deadline is looking a lot closer than it did when I decided to do-this-thing I thought it was about time I actually started doing something concrete about it!

I was thinking about spring and all the things that that brings to mind and one of my favourite things about spring is that the sun starts coming out and blows away all the wintery blues - I am definately affected by the weather and when the sun starts shining down and the rain becomes light and sparkly rather than heavy and dreary that's when my new year begins.

So, what am i choosing as my theme for the quilt? Flying Birds. I have a wonderful postcard which show a white bird flying over a vast blue ocean and to me that symbolises freedom more than any other image I've seen, but it doesn't seem to want to become a quilt! Too much bare space to fill in.

Instead I'm going with something I've been wanting to do for a while which is playing with curved flying geese. In a (hopefully not too groan-groan) twist I'm going to try and make a piece which shows traditional patchwork 'flying geese' metamorphising into actual flying geese.

I was going to piece it but that's obviously not going to work with actual gooses so instead I'm going with applique. I haven't quite decided on the background yet but I have drafted out my geese pattern.

I started out by drafting patchwork geese as though I was going to foundation piece them. I searched the internet for instructions on how to do this but failed miserably so made it up! In short:
  1. Draw freehand curves marking out the area where the geese will fly; for the quilt I'm doing these diverged away from each other as the curve progressed.
  2. Start at the base of the first goose; draw a straight line which averages out as a perpendicular to the tangent of the curves at its ends (by eye)
  3. Now the math - I wanted 'proper' flying geese so the horizontal base should be twice the height of the goose. Measure the base line, find the middle and project a vertical line from the centre point which is exactly half the width of the base.
  4. Draw the next base line, again averaging the perpendicular of tangent of the curves on either end.
  5. Mark the slopes of the triangle of the first goose (connect the dots)
  6. Repeat steps 2-5 for each goose. It's actually suprisingly easy to do!

Next I drafted out the geese gradually emerging from the triangles and finally I removed the triangles altogether to leave the birds breaking free on the constraints of the pattern.
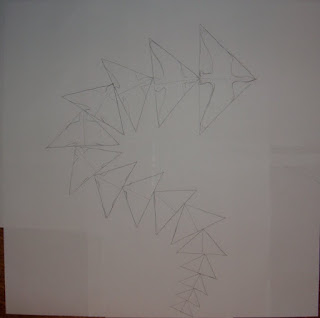
Geese In Triangles

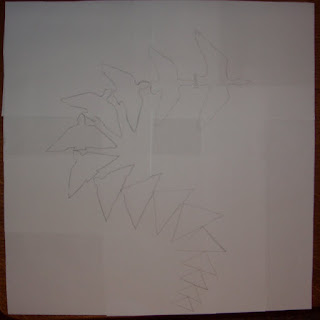
And Finally, Free Geese!

Now all I need to do is decide what colours the geese will be and what background they're flying on - for the geese I'm thinking some sort of chromatic colour progession and the backing will either be something pieced to get a bit of the traditional in there or something plain so I can do some quilting on it, not quite sure which would work better yet.

The geese will need to be redrafted so they're symetrical (the ones in the picture are somewhat wonky) and then I need to figure out the best way to applique them on. I'm thinking that reverse applique makes the most sense but I don't really want them 'sunk' so maybe something using bondaweb instead. Just need to make sure the edges are properly seamed down I think, would spoil the effect a bit if they frayed.... or maybe they should get gradually more frayed to show the feathers...

Sunday 24 May 2009

Harder than it looks

Yesterday we went down to town to look at houses and, as we were there, I stopped by the fabric shop and finally bought the wadding for my Denim Lone Star. The top and back have been ready for months but I 'stole' the original wadding for Aimee's Quilt and the Baby Bargello and never quite got round to replacing it. Because of the weight of the denim I was a touch worried that normal cotton batting would struggle to make any difference so I chanced it and bought some polyester wadding instead - at £2.40/m this could prove to be a very cheap way to finish any future demin quilts too! Shall have to see how the machine copes with it tho as the quilt is somewhat bulky to say the least.

Today I pushed all the furniture aside and just managed to get the quilt out flat in the 'dining room' so a couple of hours later and it's all basted with safety pins - I usually prefer spray baste but this thing weighs a ton and I'm just not sure if it could hold under the weight.

Now all I have to do is find the rest of my heavy-weight thread and quilt this monster!

Wednesday 20 May 2009

A Fond Farewell

Today Aimee's Quilt was delivered to it's new owner and, if the immediate attempt to fall asleep under it was any indication, I think she likes it... phew! Mum seemed very impressed and particularly admired the stars I quilted in the border so I'm glad I decided to go for it and put them in. All in all, I think it will be very happy in its new home.

Baby Bargello was also delivered to the (absolutely adorable) new born and I think we're on the same wavelength because the first question was "how do I wash it"; no fears about this one getting stuck in a cupboard then!

To finish off my blogging about these quilts I thought I'd put in some links to the patterns for them:

Baby Bargello was started at a course at the Quilt Room but is based on this wonderful free pattern by Bonnie Hunter - I made the smallest sized quilt but cut it from 5 steps to 4 to make it a rectangle rather than a square.

Aimee's quilt was pretty much made up as I went along so I was careful to keep a note of what I did and have written up full instructions on how to make it just in case I want to make another one some day!

Monday 11 May 2009

Against the Odds

Just a quick update today - been too busy filling my head with revision to manage much in the way of creativity recently but here's something I did manage to get done. This is my very first ATC. There was a 'Recycle Spring' themed swap on the FAT group recently and I contemplated joining (but didn't manage to make anything in time!) I did however eventually make this little one as a result.

The swap had brought the theme of 'Spring' to the front of my mind and whilst we were away up North I saw some beautiful Cherry Blossoms (which I have a soft spot for) but, in typical english style it was rather too chilly to properly enjoy them. Thus this piece - a Cherry Blossom tree fighting the cold... I've called it "Against the Odds"!

It's a machine sewn background (just layered material with oversewn edges rather than pieced) with a hand emroidered Cherry Blossom. The trunk is done with a sort of stem stitch and the blossoms are french knots in various shades of pink, the tree may not be anatomically correct - I made it up as I went along.

I quite like it but in retrospect I would have used a calmer background; the tree gets rather lost amid the changing prints so I think a simple mottled blue would have worked better. The binding looks a little less clunky in reality but I think I need to work on my straight lines a bit before I do it again!


Note: Explanation of ATC as requested by mum: "Artist Trading Card" measuring 3 1/2" x 2 1/2" in this case made from fabric but can be made in any medium provided the result is not overly thick.

Wednesday 6 May 2009

A pretty little something that made me happy!

I haven't done any more crafty things lately as we spent the bank holiday weekend up in Leeds at Rob's cousins' wedding but I did get a rather nice craft-related pressie while we were up there so I thought I'd share that instead!

We went out for breakfast to a little farm shop on Sunday morning (the tastiest bacon ever!) and in the shop they had these pretty little tins which caught my eye; I was going to buy one to put my crafty bits in but on closer inspection it turned out they were actually packs of cookies and it seemed a bit silly to buy the biscuits for their packaging so I left it. When we got in the car to leave Angela (Rob's mum) presented me with the very tin I had been admiring; she'd seen how much I liked it and just decided to get it for me! It made me very happy :D

So here it is - my new crafty-sewing tin; I've put all of my embelishment bits and other non-traditional sewing bits in here so I have them in one place, soooo much easier when I get the urge to be creative and just look at how pretty that tin is!

I particularly like the Daffodils

See how much more organised it is now!

Wednesday 29 April 2009

Cheating FTW!

I am finally making some progress on my Fire & Ice Quilt; I decided that I'm not going to start anything new until I clear out at least some of my UFO's and since I really want to start playing with some arty samplers this is quite an incentive!

I've tried to get on and add the centres to this quilt a few times with no sucess and recently I even tried curved piecing to see if that was more interesting (which it was until I had to unpick it all!) and finally I decided that it absolutely had to get done and I really wasn't to bothered about the authenticity of my technique. So, bye bye to burnt fingers, freezer paper and irons and hello to printed templates and pritstick. I am quite simply sticking my fabric to my paper cut outs and then gluing the curved edges over too - takes about 1min/piece and I can do it in front of the telly; I'm getting beautifully curved edges, my sewing machine loves me and I'm actually enjoying this quilt at last! When the whole thing is done it is going to sit in a big tub of water until the glue dissolves (yes, it definately is water soluble!) and then go through the wash, problem solved.

Proof: I honestly did make some progess on this beastie!

Sunday 26 April 2009

Labelled Up and Ready to Go

Today I finished up the labels for Aimee's Quilt and Baby Bargello. The label for Aimee's Quilt was originally going to be my first attempt at an ATC but Rob came in while I was making it and mentioned what a nice quilt label he thought I was making - I hadn't even thought of doing quilt labels like that (I was going with words-on-white) so once again he managed to inspire me to make something better than I was going to!

Friday 24 April 2009

Rargh...

I've been lax in updating recently... don't know why but it's felt like a very busy week despite being no different from any other! Still, I have found time to do some more work to my lion and I think I'm done with the cutting now. I still need to fix him down but I picked up some lion-coloured threads and a pack of bondaweb today so I think I should get him settled down this weeked. I took a quick picture this afternoon (which prompted this posting) as we have visitors coming tonight and I have to pack him away so they don't destroy him while drunk so here he is in all his glory. The quilt is roughly single bed sized but it didn't fit on the table and there was no way I was putting something with this many little pieces on the floor.


The mane is made from loads of different yellow/orange fabrics cut in a spiky pattern and layered on top of each other - I left a tab at the bottom of each set so I can bondaweb them down but I think i'm going to leave the spiky bits free so they flow around as the quilt gets moved. It's not quite right on the left so I'll fix that next time I lay him out but otherwise this is how he'll look. Now all I have to do is decide what's going in the outside panels... I'm thinking maybe girraffe as they're nice and tall.

Basically I'm just going to have some of fun with this, it's been on the to-do pile for sooo long that I don't mind risking it a bit - I'm going to do my best to make it into something awesome but I've been 'meh' about it for so long that if it does go horribly wrong it won't really be a great loss!

In other news I've decided to stop lurking on the internet and get out there and 'meet' a few other quilters. So I have signed up for 'Another Little Quilt Swap 3' (ALQS3) and will be attempting to make an art quilt by the middle of July - I have a few ideas I've been toying with for a while so it will be interesting to see how they take form. (And an aside to mum if you read this: It's okay not to like it and I promise to keep making 'proper' quilts too!)

Finally I'm giving in to temptation and trying my hand at ATC's - I'm currently drafting out some practice pieces and then I'm going to have a go at joining some swaps. For those that don't know these are like tiny miniature quilts (2 1/2" x 3 1/2" so I mean smaall) which you then trade with other people - kind of like the trading cards we had as kids but far prettier! I'm quite excited to start work on a collection, particularly as once we move I should get my own quilting room which I can cover in pretty fabric creations!

All in all I'm giving my muse a kick start for spring!

Sunday 19 April 2009

Meow!

After much humming and ha-ing over my Flying Safari quilt I decided that quilting alone probably was't going to be enough to fill the massive black panels that are in between my pieced blcoks and all this week I've been pondering a paint-by-number style lion. I have no idea why I decided I wanted to make one of these but once it was in my head I just couldn't get rid of it. The basic thought now is that I could make various animals from fabric and stick them in each of the empty blocks.. we shall see how it goes!

I really had no idea how to make what I wanted - I've seen a few picture-patchwork creations around but never really looked at how to make them myself so I just sort of made it up as I went along. I'm thinking I can probably just sew all the bits on top of each other with my machine applique-style and then maybe throw in some decorative effects when I quilt it.

The biggest problem was that I can't draw to save my life so after half an hour of pathetic attempts at sketching I abandoned that plan and went with just cutting bits of fabric to approximately the right shape. The nose seemed like a good place to start being fairly central so I cut one of those, then some backing for it and just built it up from there. Inevitably it will end up a bit wonky as i'm just cutting bits by eye but i'm hoping it will come out ok. He still needs a big mane and a bit more shading but i'm pretty proud of it so far; I particularly like the eyes as he started to look a lot more like a lion than a scrappy mess once they were in place!


Lion; A Work In Progress

Sunday 12 April 2009

Something Random

The quilting bug has bitten and is refusing to let go... After we drove home from Rob's parents we went out for a very nice Easter roast at Stu & Claire's and followed it up with a trip to Hobbit Real Ale & Blues festival. Not being a great pub-goer 3 hours of watching people drink every type of Ale under the sun was plenty for me and I called it a night when everyone decided to move onto the next pub. I was going to watch a film but my re-discovered Flying Safari quilt was calling to me - I discovered to my horror that this is by far my worst UFO and was actually started in 2002! It was supposed to have a flying geese border so I thought I'd assemble that (the geese were already made) but when I looked at the geese I discovered that 16yr old me had different standards than 23yr old me and there was no way on earth that those geese were going to make a border that fitted the quilt properly.

With my plans scuppered I decided it was a shame to waste all those hours I spent piecing geese so I put them together into a little wall hanging instead - I now present "Flying Free", my first piece of improvisational quilting (if I call it art it doesn't matter that I lost all my points right!). It consist of flying geese in 'tiger' and 'leopard' on a black background and whilst it may look like a completely random mish-mash there is actually a method to the madness.

Flying Free

And another finished quilt

We went back home to catch up with mum's and dad's for the start of the easter weekend and whilst curled up on the sofa 'watching' the (golf) masters I managed to finish sewing the binding onto Aimee's Quilt. I'm amazed with the results to be honest; it was always a bit of a gamble as it was the first time I've ever made a quilt without a pattern to follow and also the first time I've machine quilted rather than hand quilted one but I can honestly say that I love it. There's a large part of me that doesn't want to see this one go but I think that because it was always being made for someone else it will be easier to let go off than on of the ones I made for me... it really is about time I stopped hoarding everything I ever made anyway! I just hope that Aimee likes it; I'm pretty sure her mum will but small childern=unpredictable so I guess there isn't any way to tell other than to give it to her!


The finished quilt

Thursday 2 April 2009

Oopsy

Well, I ordered the thread to finish quilting Aimee's Quilt but I 'accidentally' added a bargain pack of Japanses Taupes. Twenty 10" squares of Makower's Zen Taupe's will shortly be arriving on my doorstep; I'm not sure what i'll do with them but they looked so pretty, and were so on Sale, that I couldn't resist! I seem to have really fallen for the Japanese fabrics at the moment, maybe I'll make a wall hanging or summat so I can admire them lots rather than stashing them in drawers to gloat over!

C'est Finis

Et Voila - Baby Bargello is done. I quilted it in a simple zig-zag and added an outline of the inner border, it's a much simpler quilting design that I'm using for Aimee's Quilt but I think it emphasises the pattern nicely without distracting attention from the pretty fabrics. All in all I'm very pleased with this quilt... All it needs now is a label and it's ready to go to its new home

Quilting in Process

And the finished quilt

Edit: I decided the pictures above don't really give any impression of the size of the quilt so, lacking a convenient small child to photograph, I have enlisted the help of Tiger (who is pretty much baby-sized) to bring you the following quilt-simulation... basically it will be plenty big enough for baby and should carry over quite nicely from cot to cot-bed as s/he grows up. Thanks to some artful corner turning you can also see the backing which quilted delightfully (not a tuck in sight!) and, according to Rob, will give them the alternative of using the quilt upside down as well... not sure what I think to the idea of hiding all my lovely patchwork in favour of an Ikea bedspread but I'm sure he meant well!


Tuesday 31 March 2009

So near, yet so far

I have very nearly finished Aimee's Quilt; I had about 1m of the outer border left to go when I ran out of thread... this quilt has now consumed 600m of thread which is absolutely insane considering that it's only about 6m square... I never realised how thread-intensive machine quilting could be.

I'm very please with the results so far, but it does leave me with something of a dilemma - do I drive the 3 hour round trip to The Quilt Room where I got the thread (and can thus be sure I'm buying the right colour) or do I just order one spool of each of the likely possiblities from the internet on the basis that I'll use it at some point. I was going to drive but when you consider that it'll cost me the best part of £20 in petrol I think that it will actually be cheaper to order excessive amounts of thread online... Next time I shall be very careful to make a note of which precise colour wave of thread I'm using before I throw the annoying sticky label away!

Anyway, the fruits of my labour so far; the inner quilting has been showcased before but I'm particularly proud of my outer border design. It's totally freehand, no pattern marking etc, and it's actually worked out better than I hoped. I'm thinking of calling this quilt 'Dreaming of Butterflies', just seems to fit with the fabric I wound up using and all the stars in the design.

Click For Bigger and Admire the Stars in the Border!

Sunday 29 March 2009

We have backing

We made it into town today and Ikea came up trumps for us. Their by-the-metre fabric didn't really have anything I liked but Rob spotted a super bedset which looked to be just the thing. It has nothing in common with the front but I really don't think it matters - it's fun and 'kiddy' and worked out to about £1.50/m so I love it.

I did all the seam removal and ironing and now it's ready to go - it's a nice coarse weave so I don't think the machine is going to mind it and I have loads left for other projects too. I must add Ikea to my list of shops to visit for bargains.

Saturday 28 March 2009

Another Top Completed

Today Rob had a hangover so he slept in really late and then spent the afternoon playing on the internet so we didn't go to town as planned, on the flip side I got to do lots of sewing!

I finished the adjustments to my Baby Bargello and added on the borders so that's another top finished. Originally it was made up of 20x20 2" squares but I don't really like square quilts, and for a cot it seemed a little unwieldy, so today I carefully removed the centre two strips and one from each side as well so that now instead of 4 five-step panels I have 4 four-step panels. It's still nice and symetrical but the overall quilit is obviously now longer than it is wide. I added the plain 'inner' border onto it and laid it out to decide if I wanted to have one or two chequerboard rows as the outer border but when I saw it properly I decided that actually I liked it just how it was so it will be staying with the single border and is thus finished :D

Now to find the backing. Tommorrow we're heading into town to go swimming and Ikea is conveniently right next to the pool so I think i'll work in a little detour to see if I can pick up some cheap meterage from them; if not I'll call the Quilt Room and see if they have any of my stars fabric left.

Friday 27 March 2009

The Blue Quilt

This quilt is literally my every-day quilt. In the winter it goes on top of the duvet for some extra warm, snuggly goodness and in the summer when it gets really hot we ditch the duvet and just keep the quilt to sleep under.

This was the first iteration of my 'denim' quilt. I was going through a phase where I was balking at paying £9 or £10 for a metre of fabric and wanting to make a more frugal and practical quilt. I originally wanted to use recycled denim but was told (quite rightly) that this really wasn't a good idea for the Quilt As You Go course I had signed up for. A quick trip to the Fabric Warehouse resulted in me picking up some light & dark 'denim' coloured cottons for about £3/m (which satisifed my frugality drive) which I mixed with some calico (which ironically cost more than double that as I had to get it from the quilt shop when I realised I didn't have a background).

The resulting quilt is simple but, I think, quite striking and uses just 3 fabrics to construct a variation of an Irish Chain (as featured in Carolyn Forster's Quilting On The Go book which I highly recommend). It was the first time I'd tried the quilt as you go method and, whilst it does add a couple of extra stages, it makes the hand quilting sooo much easier - I would never have wanted to do as much quilting as I did if I had to manhandle the entire quilt all the time. Also, I was a little afraid that the assembled quilt would be weaker than a traditional quilt (each block is constructed seperately so there isn't a solid piece of wadding/backing running through it) but it's been in daily use for the best part of 2 years now and isn't showing any signs of stress.

The whole quilt (King Sized)

Detail of the hand quilting (Click image to see better)

I used the same fabric on the back of each block as on the front so there is a chequerboard effect on the reverse.

Top Quilting Done

The main quilting is done and I have painstakingly worked every last stray thread back into the quilt top - I make it about 10 hours to quilt on the machine and then another 3 to work the ends in; got to be the quickest quilting I've ever done and I'm really pleased with the results. It's not perfect but it's pretty damned good if I say so myself :D

Detail of Quilting

Wednesday 25 March 2009

Introducing the Denim Lone Star

I'd been wanting to make a quilt out of old jeans for ages but for obvious reasons the tutors on my quilting classes expressed considerable doubt about me using denim for patchwork (hence how The Blue Quilt came to be). I decided that the only way to get my quilt made was to go it alone so I set to work choosing a pattern.

There was a lovely post on my old blog (eaten by the free-hosting company) that showed all the different sorts of denim quilts that I came across on my internet searching, I may well recreate it when I have some spare time - for now let me say there are many. But none of them were quite what I wanted.

Eventually I realised what it was that I really wanted to make: A Denim Lone Star quilt. I love the lone star pattern and the radiating bands of colour in the star but the sheer number of diamonds had always put me off. This then was the perfect solution - denim is heavy and thick therefore I had the perfect excuse to use big pieces and by carefully sorting my stash of old jeans I could get the bands of colour I so admired and add a tonal spin to things too.

Again, on the old blog there was a step-by-step record of exactly how I made the quilt. This too will hopefully be revived but will take a little while to re-assemble.

For now, here it is - the Denim Lone Star Quilt. The blue is all recycled jeans (and a skirt) the background I cheated on and bought from Fabric Land (but it was really cheap if that helps!). It's massive and it weighs a ton - it's too big for my king-sized bed and only just fits on my living room floor but I love it. It was originally destined to be a picnic rug but I've become quite horrified by the thought of that lovely white backing getting muddy so I think it will be a sofa throw instead.

Monday 23 March 2009

Background Musings

I have some lovely starry fabric to do the inner border on my Baby Bargello but as-yet I haven't bought a backing. I was going to just get a couple of metres of Sleepytime fabric to match the front but it appears that it's nigh-on impossible to get in the UK,doubly so if you don't want blue or pink.

Time for a rethink then... perhaps I could go with the inner border fabric, if I do that then I probably want to bind it in it too, and the bolt I bought it from was looking distinctly on the slim side but surely the internet will have some for me. Nope, no such luck. Even after I mananged to figure out what it was (Sage Stars from Timeless Treasure's Noah's Ark range) it appears that it's just as hard to get hold of as the Sleepytime. I really must start asking how long a range has been out before I buy from it! I guess I need to finish my adjustments to the quilt top, give it a quick measure and some time next week I'll take the plunge and call the Quilt Room to see if they have enough of this left for me!


The elusive Sage Stars

Saturday 21 March 2009

Let the quilting begin

I've taken the plunge and started on the machine quilting and against all the odds it's actually going quite well. I think the machine quilting course paid off - apart from a slight whoopsy at the beginning (where i made the squiggles waaay too small) everythings gone fairly smoothly. And it's quick too, maybe 4 hours worth of work has resulted in over half the quilt done. I think I may be doing this again - it doesn't quite have the same relaxation factor as hand quilting but it is remarkably theraputic and the hours are wizzing by.

Quilting in Progress

Thursday 19 March 2009

Basting, Check

One step closer to the finish line - I basted Aimee's Quilt today. Slight hiccup when I managed to fix the shorter spare backing fabric to the wadding instead of the actual backing piece but thanks to the ever forgiving 505 spray I was able to replace it with the correct piece with no major issues.

All set to start on the machine quilting, slightly scary cos I've never actually done it on a proper quilt before (and am possibly being a bit ambitious by jumping in with the meandering instead of straight lines) - we'll see how it goes.

Saturday 14 March 2009

Baby Bargello

Today I started my Baby Bargello - the course was a birthday gift from my mum and we spent a very enjoyable day at The Quilt Room where I managed to piece the entire centre of the quilt in about 5 hours - I was impressed with myself!

It was probably one of the most enjoyable courses i've been on in a while as the teaching was excellent and it was easy to get your teeth into the quilt - once you understood how to stagger the strips it was just sewing in a straight line which is something I find very theraputic.

My jelly roll worked nicely too - I was a little worried that using only one fabric range (albeit in 5 colourwaves) would result in a rather insipid quilt but instead I have a beatifully subtle centrepiece. It needs to have borders added but other than that it's all done - I think this will definately be a pattern to remember for the future; easy to make and very pleasing to the eye.

The pieced centre

Detail of fabrics

Saturday 7 March 2009

New Beginnings

After a timely reminder from my mum I've finally remembered to order the fabric for the baby quilt I will be making next weekend. I was going to get an insanley well priced fat quarter pack shipped from America but that would have needed ordering about a month ago to get the shipping at a decent rate. The course notes reckon a jelly roll will cover a small quilt and thankfully after some googling Sleeping Bear Crafts appear to have what I need - a Moda Sleepytime jelly roll. All set for a gender neutral but hopefully not too monotone 'scrappy' bargello!


Thursday 5 March 2009

Introducing Black Cats

Having mentioned my Around the World foundation pieced quilt I think it's time to introduce it to the world. A couple of years ago at the Sandown quilt show I found some charm packs consisting soley of cat fabrics (from The Contented Cat). I just had to buy them but then I had to find a use for them too... We had just done a foundation piecing course so I had some 1cm squared vilene lying around so I decided I was going to make a quilt out of 1cm log cabins. Conveniently 1" strips work out pretty well for the seam allowances so each 6" charm square yielded 6 strips - just enough to make 2 log cabin blocks. Of course the finished blocks are quite small (7cm square to be precise) so after some quick calculations I realised it would take about 420 blocks to make a double quilt... still, I find long projects very comforting to work on - the finish line is so far away that you can just enjoy the sewing and you don't really have to look at the big picture until way down the line!

Because the cat fabrics come in just about every colour under the sun I decided to use black as the background fabric - I started off with plain black but my Flying Safari quilt taught me that too much plain black is really boring to look at so I later widened the backing to include black-on-black prints which I hope will balance nicley with the patterned cats.

Anyway, I went back to my project bag today and checked on my progress - I appear to have in the region of 140 blocks finished so I'm about a third of the way there. I think this one's been sat in the cupboard for at least a couple of years now so it really is time I paid it some attention. I took a few piccys to remind me to work on it some more so here it is: Black Cats


One Block - See the ruler at the bottom for size!

16 blocks together - 28cm in total (just over 11")

Wednesday 4 March 2009

One Step Closer

I just got back from Brecon yesterday and was in a doing-things mood. The original plan when I took an extra day off work was to do all the housework and get the holiday stuff squared away - somehow it accidentally turned into a doing-some-patchwork day instead!

I have finally (almost a year to the day) finished the arcs for my New York Beauty. 48 beautifully pieced foudation arcs in shades of red and blue now lie on the ironing board waiting to be completed with inner and outer blocking. I set the sewing machine up in front of the telly, wacked the volume up high and 5 hours of re-runs later finally finished the last 12 arcs. I think i'm giving the foundation piecing a break for a while - the results are definately cool but the fact that I had to trim after every single piece really got to me - very hard to build up a rhythm. Still, finished now.

I also cut all the centres and outers for the blocks so now it's just a case of ironing the freezer paper, tacking the curves and overstitching them to the arcs.... I still love the look of the New York Beauty but all the funny-sewing means that I'm unlikely to make another and I have point-blank refused to even contemplate piecing the pointy border... I'll find some other way to finish it; anything but more foundation pieced spikes!


Next stupidly ambitions project to finish is the 420+ foundation pieced log cabin blocks for my around the world quilt. I am quite possibly mad but I'm a good couple of hundred into it now so it will definately get finished... eventually!

Sunday 22 February 2009

Decision Made

Today I added the borders to Aimee's Quilt. My mum liked the colour of the pink roses with the blue inner border (top right in my previous post) but felt the roses were perhaps not quite a 3-year old pattern. I liked the butterflies more but wasn't sure if they were too bold. In the end Rob manfully stepped up and gave his opinion that butterflies and marbelled purple looked best and after some consideration I had to agree with him so that's what went on. I should ask him for advice more often it seems 'cos he was absolutely right and the butterflies look great - they also balance out all the white in the middle so it looks more 'girly' and less 'grandma'!

Edit: I was going to leave the odd pale lines in the top right corner alone but they started to really bug me (they're where the batik didn't dye right at the edges of the fabric). I've now carefully unpicked the seams up there and pieced in some of the spare border fabric - I have one more seam than there was before but it looks a lot better now.

Friday 20 February 2009

Choices, Choices

Now that all the stars are pieced now for Aimee's Quilt I've run into a couple of new problems... What border should I use? And how on earth should I quilt this? The basic plan for the quilting is some sort of all over quilting pattern that I can run off on my machine - I don't really have time to quilt it by hand and paying for it to be long-armed would rather defeat the point of a cheap scrap quilt! Of course I've never actually quilted anything on my machine except for samplers so putting the plan into practice could be interesting. Still, you've got to start somewhere I guess!

I have a few options for the borders - I have enough of one of the purples and one of the pinks to make outer borders so I could go for thin purple/wide pink or vice versa, I could also bring in the backing fabric (my bargain batik) although I'm not sure if this will be too strong compared to the softer pinks in the pieced top. I shall have to ponder... Below are some snapshots I worked showing all the possible combinations.